2019年2月28日 星期四

WSL 安裝 Visual Studio Code 記錄筆記

去官網下載 .deb 安裝檔
https://code.visualstudio.com/download

使用 dpkg 指令安裝 Visual Studio Code
sudo dpkg -i code_1.31.1-1549938243_amd64.deb

如果發生錯誤訊息:
dpkg: dependency problems prevent configuration of code:
 code depends on libnotify4; however:
  Package libnotify4 is not installed.
....
 code depends on libxss1; however:
  Package libxss1 is not installed.

dpkg: error processing package code (--install):
 dependency problems - leaving unconfigured
Processing triggers for mime-support (3.60ubuntu1) ...
Errors were encountered while processing:
 code

先執行 sudo su 換 root 權限
輸入
sudo apt update
sudo apt-get -f upgrade
執行更新一下

再安裝相關依賴的函示庫
sudo apt install libnotify4 libnss3 libxkbfile1 libsecret-1-0 libgtk-3-0 libxss1

再輸入一次安裝 Visual Studio Code
sudo dpkg -i code_1.31.1-1549938243_amd64.deb
應該是就安裝成功了(到這一步,我安裝成功了)

輸入 code 執行 Visual Studio Code
如果發生錯誤訊息:
/usr/share/code/bin/../code: error while loading shared libraries: libX11-xcb.so.1: cannot open shared object file: No such file or directory

輸入
sudo apt-get install libxss1

如果還是一樣發生錯誤,可以試試輸入
sudo apt-get install gconf-service libxext6 libxfixes3 libxi6 libxrandr2 libxrender1 libcairo2 libcups2 libdbus-1-3 libexpat1 libfontconfig1 libgcc1 libgconf-2-4 libgdk-pixbuf2.0-0 libglib2.0-0 libgtk-3-0 libnspr4 libpango-1.0-0 libpangocairo-1.0-0 libstdc++6 libx11-6 libx11-xcb1 libxcb1 libxcomposite1 libxcursor1 libxdamage1 libxss1 libxtst6 libappindicator1 libnss3 libasound2 libatk1.0-0 libc6 ca-certificates fonts-liberation lsb-release xdg-utils wget

安裝完

輸入 code --version 測試 Visual Studio Code 是否安裝成功!
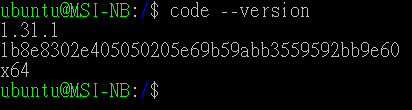


顯示版本號,安裝成功!

2019年2月26日 星期二

ASP.NET Core (包含 .NET Core)如何超簡單讀取客制化 json 檔案

利用 ConfigurationBuilder 就可以讀取客制化的 Json 檔案

                // 讀取客制化 Json 檔案
                // Json 檔案格為 appsettings.[目前組態].json
                string appsettingJson_ = $"appsettings.{DebuggingProperties.Config}.json";

                // 讀取目錄內客制化的 Json 檔案
                _config = new ConfigurationBuilder()
                .SetBasePath(Directory.GetCurrentDirectory())
                .AddJsonFile(appsettingJson_, optional: true)
                .Build();

DebuggingProperties.Config 的原理可以參考這篇:怎樣判斷 .NET Core (包含 ASP.NET Core)是 Debug 或 Release ?

Microsoft Visual Studio 無法連接到 Web 伺服器 'IIS Express' 的解決方法

今天莫名其妙出現「無法連接到 Web 伺服器 'IIS Express'」的錯誤訊息


一直無法 Debug
查了一下專案「屬性」設定


修改「偵錯」頁籤
的「應用程式 URL」後面得 Port
就能正常偵錯了

2019年2月25日 星期一

ASP.NET Core (包含 .NET Core)依據組態為 Release 或 Debug 取得各自的設定內容

首先取得目前的組態,如下列的程式碼:
原理可以參考這篇:怎樣判斷 .NET Core (包含 ASP.NET Core)是 Debug 或 Release ?


    public static class DebuggingProperties
    {
        /// 
        /// 檢查當前正在運行的程式組態。
        /// 
        public static string Config
        {
            get
            {
                if (_ConfigAttribute == null)
                {
                    var assembly = Assembly.GetEntryAssembly();
                    if (assembly == null)
                    {
                        // 由於調用 GetFrames 的 StackTrace 實例沒有跳過任何幀,所以 GetFrames() 一定不為 null。
                        assembly = new StackTrace().GetFrames().Last().GetMethod().Module.Assembly;
                    }

                    var assemblyConfigurationAttribute = assembly.GetCustomAttribute();
                    _ConfigAttribute = assemblyConfigurationAttribute.Configuration;
                }

                return _ConfigAttribute;
            }
        }

        private static string _ConfigAttribute;
    }

appsettings.json 檔案設定格式如下:


{
  "Release": {
    "DefaultConnection": " Release Server"
  },
  "Debug": {
    "DefaultConnection": "Debug Server"
  }
}

需要組態設定時,只要如下呼叫即可: 在 Startup.cs 新增下列程式碼:
            public IConfiguration _config { get; } 

// 取的 appsettings.json 的設定
public Startup(IConfiguration configuration)      
{                                               
    _config = configuration;                
}                                                 


// 執行中取得組態設定的方式
public void Run()
{
    // 取的 appsettings.json 的 Release 或 Debug 組態設定
    var cfg_ = _config.GetSection(DebuggingProperties.Config);
    // 取的 appsettings.json 指定組態設定內容
    string def_ = cfg_ .GetValue("DefaultConnection");
            }

2019年2月23日 星期六

2019年2月22日 星期五

Ubuntu 執行後出現錯誤訊息 The type initializer for 'Gdip' threw an exception. 錯誤訊息的解決方法

最近安裝了 nuget 的 NPOI 來處理 excel 檔案
在 Ubuntu 的 Linux 環境發生了 The type initializer for 'Gdip' threw an exception. 的錯誤訊息
執行 sudo ln -s /lib/x86_64-linux-gnu/libdl.so.2 /lib/x86_64-linux-gnu/libdl.so
執行完畢,就能解決這個問題。

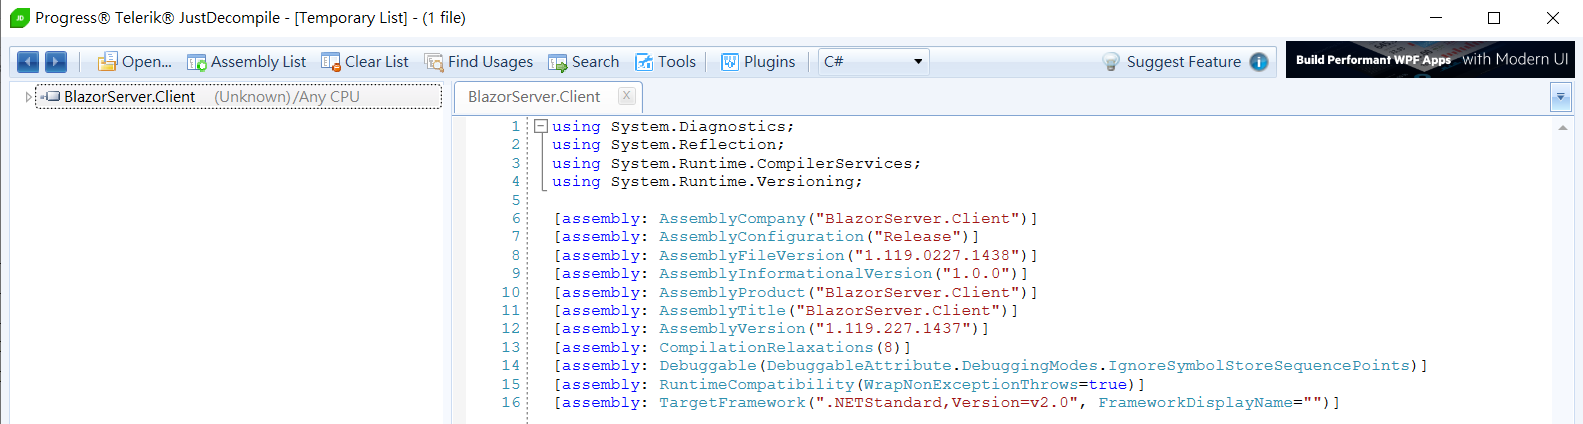
怎樣判斷 .NET Core (包含 ASP.NET Core)是 Debug 或 Release ?

用 JustDecompile 可以看到 DLL 的資訊

下面是 Debug 版本的資訊 :


下面是 Release 版本的資訊 :

這樣我們可以用下面的程式碼,判斷 DLL 是否為 Debug 版本。


2019年2月20日 星期三

在多個 .NET Core 版本之間進行切換

建立一個 global.json
{
  "sdk": {
    "version": "2.1.503"
  }
}
只要指定版本號,就能執行 .NET Core 特定版本號

升級 dotnet core 3.0 造成 Blazor for dotnet core 2.1 無法執行的問題解決

編譯後在 ubuntu 上執行發生錯誤訊息:
It was not possible to find any compatible framework version
The specified framework 'Microsoft.AspNetCore.App', version '2.1.8' was not found.


原因是 AspNetCore 預設使用 2.1.8
而 Blazor 只能在 2.1.7 上正常執行
解決方法是修改 Visual Studio 的 *.csproj
指定 AspNetCore 的版本號為 2.1.7
PackageReference Include="Microsoft.AspNetCore.App"


修改設定指定版本為 2.1.7
(AWS EC2 預設 Image 為 2.1.2 改成 2.1.2 試過可以正常執行)
PackageReference Include="Microsoft.AspNetCore.App" Version="2.1.7"


重新編譯後的新版本就能正常的執行了

PS.如果在 Visual Studio 2017 出現錯誤訊息:
Unhandled Exception: System.IO.FileLoadException: Could not load file or assembly 'Microsoft.AspNetCore, Version=2.1.7.0, Culture=neutral, PublicKeyToken=adb9793829ddae60'. The located assembly's manifest definition does not match the assembly reference. (Exception from HRESULT: 0x80131040)
只要把剛剛的修改還原就能 Debug 了。

2019年2月14日 星期四

為 Ubuntu 增加 PATH 的環境變數

修改系統檔案都要用 root 權限
先執行 sudo su 換 root 權限
可以用 vim /etc/profile

然後
按下 i
在檔案末端加上
export DOTNET_ROOT=$HOME/dotnet
export PATH=$PATH:$HOME/dotnet

或直接指定安裝路徑
export DOTNET_ROOT=/usr/share/dotnet
export PATH=$PATH:/usr/share/dotnet

輸入 :wq
離開 vim 編輯

執行 . /etc/profile

就能在任何目錄上呼叫 dotnet 了


Git GUI 中文亂碼解決方法

開啟 Edit = Option 選單

選擇 Default File Contents Encoding 為 utf-8

Save 存檔後,就正常顯示中文了。

Visual Studio 2017/2019 推薦的擴充功能與更新

參考文章: 覺得 Google 的 Blogger 不太順手?透過 HTML 的 iframe 移花接木 HackMD