顯示具有 C# 標籤的文章。 顯示所有文章

2019年5月25日 星期六

ASP.NET Core 安裝 NSwag 自動產生 API 說明文件檔案

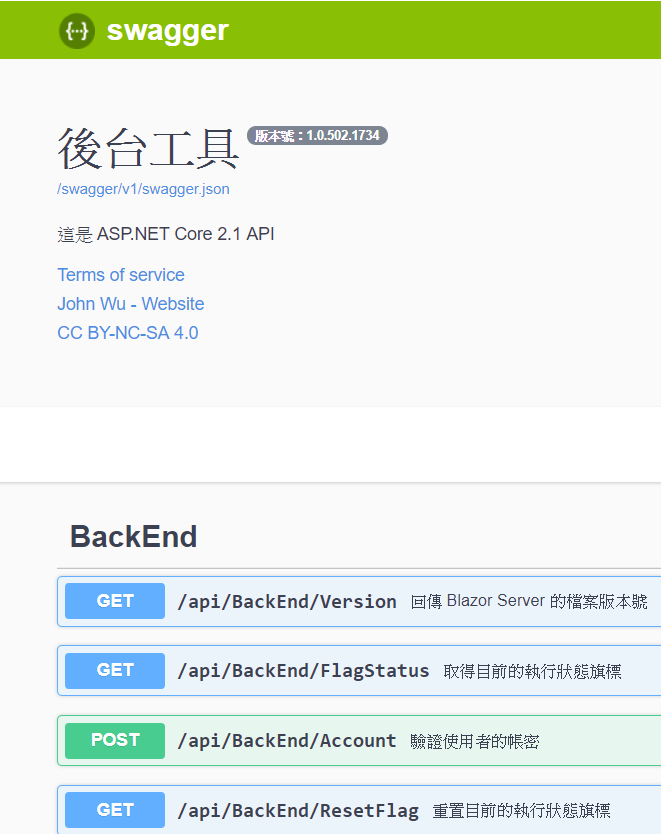
目的:自動抓取註解產生下面的 API 說明文件網頁


上次講到 Swashbuckle 在 Ubuntu 環境,
專案執行發生異常,
於是就換了 NSwag,
目前執行下來沒什麼問題,
這邊記錄一下安裝的過程與要注意的事項。


安裝 NuGet 套件:
NSwag.AspNetCore                                  NSwag 主要套件
NSwag.SwaggerGeneration.AspNetCore 自動從 cs 抓註解到我們指定的 xml 檔案


新增「隱藏警告:1591」

PS.特別要注意 xml 檔案名稱要跟專案一樣,才能自動抓取到註解內容


先引用 NSwag.AspNetCore


using NSwag.AspNetCore;


設定一下 Startup.cs 的 ConfigureServices


public void ConfigureServices(IServiceCollection services)
{
 services.AddMvc();


 #region Register the Swagger services

 // Register the Swagger services
 services.AddSwaggerDocument();

 #endregion Register the Swagger services
}


與設定一下 Startup.cs 的 Configure


public void Configure(IApplicationBuilder app, IHostingEnvironment env)
{


       #region Register the Swagger generator and the Swagger UI middlewares

       // Register the Swagger generator and the Swagger UI middlewares
 
        app.UseSwagger();
        app.UseSwaggerUi3();

        #endregion Register the Swagger generator and the Swagger UI middlewares


        app.UseMvc(routes =>
        {
             routes.MapRoute(name: "default", template: "{controller}/{action}/{id?}");
        });
}


記得註解 <summary> 要寫,每次編譯後 XML 的內容都會更新唷!


/// <summary>
/// 簡單的 Controller 範例
/// </summary>


程式開啟後,輸入網址 http://localhost:port/swagger
就能開啟 Swagger UI 網頁


2019年5月23日 星期四

c# async 和 await 簡易說明

函式前面增加 async 就會成為異步函式(執行過程中不會等待函式執行完畢才往下跑)


/// <summary>
/// 異步函式
/// </summary>
static async void AsyncFun()
{
 // 裡面要有 await 關鍵字

 // await 後面要接回傳 Task 的函式
 // 因為回傳 Task 簡稱他為異步任務

 List<formatter> f_ = new List<formatter>{
  new Formatter("「異步任務」", Color.Red)};

 Print("執行 {0} 『開始』", Color.Yellow, f_.ToArray());
 bool ret_ = await DelayFun();
 Print("執行 {0} 『結束』", Color.Yellow, f_.ToArray());
}


異步函式內需要有await 關鍵字
await 後面要接回傳 Task 的函式
因為回傳 Task 簡稱他為異步任務


/// <summary>
/// 異步任務
/// </summary>
/// <returns>true</returns>
static Task<bool> DelayFun()
{
 return Task.Run(() =>
 {
  List<Formatter> f_ = new List<Formatter>{
   new Formatter("等待五秒", Color.YellowGreen)};

  Print("{0} 開始", Color.Red, f_.ToArray());
  Thread.Sleep(5000);
  Print("{0} 結束", Color.Red, f_.ToArray());
  return true;
 });
}


異步函式呼叫與一般函式一樣
只差在執行中不等待函式執行完


static void Main(string[] args)
{
 ....
 // 異步函式
 List<Formatter> f0_ = new List<Formatter>{
  new Formatter("「異步函式」", Color.Red)};
 Print("執行 {0} 開始", Color.Green, f0_.ToArray());
 AsyncFun();
 Print("執行 {0} 結束", Color.Green, f0_.ToArray());
 ....
}


最後可以看到「異步任務」
在程式執行完畢後
才把任務跑完


利用 .NET Standard 函式庫 的 C# 取得 Git 版本號


這邊遇到找不到 Git 的環境變數
所以在 @"Git\cmd" 做了一些修改
這邊得看看你 Git 的執行檔在那個目錄內
再做調整與修改


public class CommitID
{
 private static string EnvironmentVariable
 {
  get
  {
   string sPath = Environment.GetEnvironmentVariable("Path");
   var result = sPath.Split(';');
   for (int i = 0; i < result.Length; i++)
   {
    if (result[i].Contains(@"Git\cmd"))
    {
     sPath = result[i];
    }

   }
   return sPath;
  }
 }

 public static void GetCommitID()
 {
  string gitPath = System.IO.Path.Combine(EnvironmentVariable, "git.exe");
  Console.WriteLine($"環境路徑:{gitPath}");
  Process p = new Process();
  p.StartInfo.FileName = gitPath;
  p.StartInfo.Arguments = "rev-parse HEAD";
  p.StartInfo.CreateNoWindow = true;
  p.StartInfo.UseShellExecute = false;
  p.StartInfo.RedirectStandardOutput = true;
  p.OutputDataReceived += OnOutputDataReceived;
  p.Start();
  p.BeginOutputReadLine();
  p.WaitForExit();
 }

 private static void OnOutputDataReceived(object sender, DataReceivedEventArgs e)
 {
  if (e != null && !string.IsNullOrEmpty(e.Data))
  {
   ID = e.Data;

   Console.WriteLine(e.Data);
  }
 }

 public static string ID { get; set; } = "";
}


使用方法:
先呼叫 GetCommitID()
之後 ID 就會有 Git 的版本號
他會取得目前執行目錄上的 Git 版本號


2019年5月22日 星期三

Visual Studio Code 的 cs 檔案中文亂碼解決方法

點擊右下編碼


選擇『以編碼重新開啟』


選擇『Traditional Chinese (Big5) cp950』
這時文件內的中文就會正常顯顯示了


因為 Visual Studio Code 開啟檔案預設是 UTF-8
所以要避免每次都要設定『Traditional Chinese (Big5) cp950』
選擇『以編碼儲存』


選擇 UTF-8 下次打開檔案就能正常顯示中文了


2019年5月18日 星期六

ASP.NET Core 安裝 Swashbuckle 自動產生 API 說明文件檔案

目的:自動抓取註解產生下面的 API 說明文件網頁


NuGet 安裝 Swashbuckle.AspNetCore


引用 Swashbuckle.AspNetCore.Swagger


using Swashbuckle.AspNetCore.Swagger;

設定 Startup.cs 的 ConfigureServices

public void ConfigureServices(IServiceCollection services)
{
 services.AddMvc();
 
 #region 註冊 Swagger
 // 註冊 Swagger
 services.AddSwaggerGen(c =>
 {
  c.SwaggerDoc(
   // name: 攸關 SwaggerDocument 的 URL 位置。
   name: "v1",
   // info: 是用於 SwaggerDocument 版本資訊的顯示(內容非必填)。
   info: new Info
   {
    Title = "標題",
    Version = "版本號 1.0.0",
    Description = "說明",
    TermsOfService = "無",
    Contact = new Contact
    {
     Name = "強尼 John Wu",
     Url = "https://blog.johnwu.cc"
    },
    License = new License
    {
     Name = "西西 CC BY-NC-SA 4.0",
     Url = "https://creativecommons.org/licenses/by-nc-sa/4.0/"
    }
   }
  );
  // 為 Swagger JSON and UI設置xml文檔註釋路徑
  var basePath = Path.GetDirectoryName(typeof(Program).Assembly.Location);//獲取應用程序所在目錄(絕對,不受工作目錄影響,建議採用此方法獲取路徑)
  var xmlPath = Path.Combine(basePath, "Swagger.xml");
  c.IncludeXmlComments(xmlPath);
 });
 #endregion 註冊 Swagger
}


點選「屬性」「建置」
新增「隱藏警告」1591
新增「XML 文件檔案」程式碼設定 Swagger.xml 這邊也填入 Swagger.xml


設定 Startup.cs 的 Configure

public void Configure(IApplicationBuilder app, IHostingEnvironment env)
{

 #region 註冊 Swagger
 // 註冊 Swagger
 app.UseSwagger();
 app.UseSwaggerUI(c =>
 {
  c.SwaggerEndpoint(
   // url: 需配合 SwaggerDoc 的 name。 "/swagger/{SwaggerDoc name}/swagger.json"
   url: "/swagger/v1/swagger.json",
   // name: 用於 Swagger UI 右上角選擇不同版本的 SwaggerDocument 顯示名稱使用。
   name: "RESTful API v1.0.0"
  );
 });
 #endregion 註冊 Swagger

 app.UseMvc(routes =>
 {
  routes.MapRoute(name: "default", template: "{controller}/{action}/{id?}");
 });

}
   
程式開啟後,輸入網址 http://localhost:port/swagger
就能開啟 Swagger UI 網頁


PS.在 Blazor 安裝 Swagger 後,
在 Ubuntu 上執行有異常(收不到封包),
最後換了 NSwag 才正常


2019年5月8日 星期三

ASP.NET Core 的內建 DI

以讀取預設的 appsetting.json 為例


{
  "Logging": {
    "LogLevel": {
      "Default": "Warning"
    }
  }
}


建立存放 appsetting.json 的類別 MySetting.cs


public class MySetting
{
    public Logging Logging { get; set; }
}

public class Logging
{
    public LogLevel LogLevel { get; set; }
}

public class LogLevel
{
    public string Default { get; set; }
}


在 Startup.cs 的 ConfigureServices 中註冊


public void ConfigureServices(IServiceCollection services)
{
    services.Configure<mysetting>(Configuration);

    services.AddMvc().SetCompatibilityVersion(CompatibilityVersion.Version_2_1);
}


在 Controller 中使用 IOptions <mysetting>注入


public class HomeController : Controller
{
    private IOptions<mysetting> myOption;

    public HomeController(IOptions<mysetting> _option)
    {
        myOption = _option;
    }
}


2019年5月5日 星期日

如何在 GitHub 上的 README.md 寫入 C# 程式碼

GitHub 上寫 README.md 如果須要寫入 C# 程式碼範例 可以透過 ```csharp 開頭包住程式碼並用 ```做結尾 格式如下:


```csharp
public class MyLogger : ILogger
{
    public void Print(string msg, Color color)
    {
        Log.Print(msg, color);
    }
}
```


這樣就能順眼的顯示 C# 的程式碼了,如下圖:


2019年2月26日 星期二

ASP.NET Core (包含 .NET Core)如何超簡單讀取客制化 json 檔案

利用 ConfigurationBuilder 就可以讀取客制化的 Json 檔案

                // 讀取客制化 Json 檔案
                // Json 檔案格為 appsettings.[目前組態].json
                string appsettingJson_ = $"appsettings.{DebuggingProperties.Config}.json";

                // 讀取目錄內客制化的 Json 檔案
                _config = new ConfigurationBuilder()
                .SetBasePath(Directory.GetCurrentDirectory())
                .AddJsonFile(appsettingJson_, optional: true)
                .Build();

DebuggingProperties.Config 的原理可以參考這篇:怎樣判斷 .NET Core (包含 ASP.NET Core)是 Debug 或 Release ?

2019年2月25日 星期一

ASP.NET Core (包含 .NET Core)依據組態為 Release 或 Debug 取得各自的設定內容

首先取得目前的組態,如下列的程式碼:
原理可以參考這篇:怎樣判斷 .NET Core (包含 ASP.NET Core)是 Debug 或 Release ?


    public static class DebuggingProperties
    {
        /// 
        /// 檢查當前正在運行的程式組態。
        /// 
        public static string Config
        {
            get
            {
                if (_ConfigAttribute == null)
                {
                    var assembly = Assembly.GetEntryAssembly();
                    if (assembly == null)
                    {
                        // 由於調用 GetFrames 的 StackTrace 實例沒有跳過任何幀,所以 GetFrames() 一定不為 null。
                        assembly = new StackTrace().GetFrames().Last().GetMethod().Module.Assembly;
                    }

                    var assemblyConfigurationAttribute = assembly.GetCustomAttribute();
                    _ConfigAttribute = assemblyConfigurationAttribute.Configuration;
                }

                return _ConfigAttribute;
            }
        }

        private static string _ConfigAttribute;
    }

appsettings.json 檔案設定格式如下:


{
  "Release": {
    "DefaultConnection": " Release Server"
  },
  "Debug": {
    "DefaultConnection": "Debug Server"
  }
}

需要組態設定時,只要如下呼叫即可: 在 Startup.cs 新增下列程式碼:
            public IConfiguration _config { get; } 

// 取的 appsettings.json 的設定
public Startup(IConfiguration configuration)      
{                                               
    _config = configuration;                
}                                                 


// 執行中取得組態設定的方式
public void Run()
{
    // 取的 appsettings.json 的 Release 或 Debug 組態設定
    var cfg_ = _config.GetSection(DebuggingProperties.Config);
    // 取的 appsettings.json 指定組態設定內容
    string def_ = cfg_ .GetValue("DefaultConnection");
            }

2019年1月1日 星期二

C# Tuples 回傳一個以上的回傳值

C# 7 函式內部回傳兩個回傳值:


(bool retIsError, string retMessage) Request(string request, string returnValue)
{
    // Tuples
    bool retIsError_ = true;
    string retMessage_ = "";
 
    // 處理
 
    retIsError_ = false;
    retMessage_ = "成功";
    return (retIsError_, retMessage_);
}


C# 7 函式外部接兩個回傳值:


// 接兩個回傳值
var (retIsError, retMessage) = Request(request, ref returnValue_);
if (retIsError)
{
   return returnValue_;
}


2018年8月27日 星期一

C# 利用變數接函式副本

變數 Action function 可以接 void Function() 的副本
例如: Action function = void Function();

變數 Action function 可以接 void Function(T) 的副本
例如: Action function = void Function(int);

變數 Func function 可以接 T3 Function(T1, T2) 的副本(PS.最後一個T3是回傳值)
例如: Func function = string Function(int, byte);

變數 Func function 可以接 T Function() 的副本
例如:Func function =  int Function();

2018年5月7日 星期一

超簡單一分鐘學會 DI 框架 AutoFac

DI—Dependency Injection 依賴注入

安裝 AutoFac 的 NuGet 套件


static void Main(string[] args)
{
    // 註冊繼承 interface 的子類別
    var builder_ = new ContainerBuilder();
    builder_.RegisterType<Mylogger>().As<Ilogger>();
                         
    // 取得繼承 interface 的子類別
    var container_ = builder_.Build();
    var logger = container_.Resolve<Ilogger>();
}


整理一下,簡單的說:

1. ContainerBuilder.Register 註冊繼承 interface 的子類別
 2. Container.Resolve 取得繼承 interface 的子類別 

AutoFac 功能非常強大,上面程式碼只是入門

2018年3月16日 星期五

Visual Studio 2017 上 .NET Standard 超級簡單產生 NuGet 的 *.nupkg 檔案方式

點擊「偵錯」的「屬性」選項
開啟專案屬性頁


勾選「套件」選項的「建置時產生 NuGet 套件」,如上圖:
並填寫一些基本資料,每次「建置」就會同時產生 *.nupkg 檔案了。

2018年1月1日 星期一

簡單介紹 C# 的 yield return

情境:
找出 1 到 n 的整數中被 x 整除的數

第一版 C# 程式碼

private static void OutputFor1(int max, int divisible)
{
 for (int currentNum = 1; currentNum <= max; currentNum++)
 {
  if (currentNum % divisible != 0)
  {
   continue;
  }
  System.Console.Write($"{currentNum} ");
 }
 System.Console.WriteLine();
}

第一版修改原因:
1.每行顯示一個數字
2.邏輯改成被 x 乘於二整除的數


private static void OutputFor2(int max, int divisible)
{
 //
 // 某數的2倍整除 & 顯示由上而下
 //
 #region 說明
 // 改變顯示方式及運算邏輯時都改動這段程式碼
 // 違反「單一職責」
 #endregion 說明
 int numMultiplyByTwo_ = divisible * 2;
 for (int currentNum = 1; currentNum <= max; currentNum++)
 {
  //if (currentNum % num != 0)
  if (currentNum % numMultiplyByTwo_ != 0)
  {
   continue;
  }
  //System.Console.Write($"{currentNum} ");
  System.Console.WriteLine($"{currentNum} ");
 }
 System.Console.WriteLine();
}


針對違反「單一責任」對程式碼進行優化


private static void OutputForeachList(int max, int divisible)
{
 foreach (int item in EnumerableList(max, divisible))
 {
  System.Console.WriteLine($"{item} ");
 }
 System.Console.WriteLine();
}

private static IEnumerable EnumerableList(int max, int divisible)
{
 List result_ = new List();

 for (int currentNum = 1; currentNum <= max; currentNum++)
 {
  System.Console.WriteLine($"讀取{currentNum} ");
  if (currentNum % divisible != 0)
  {
   continue;
  }
  result_.Add(currentNum);
 }
 return result_;
}


雖然執行結果正確,但是會發現一個效能問題。
EnumerableList(50, 2) 會無條件跑完 1 到 50
OutputForeachList 會跑 2,4,6...50
但是 OutputFor2(50, 2) 最多只會跑 50 次
雖然提升了維護性
為了效能
只好再對程式碼再進行一次優化


private static void OutputForeachList2(int max, int divisible)
{
 foreach (int item in EnumerableYield(max, divisible))
 {
  System.Console.WriteLine($"{item}");
 }
 System.Console.WriteLine();
}

private static IEnumerable EnumerableYield(int max, int divisible)
{
 for (int currentNum = 1; currentNum <= max; currentNum++)
 {
  System.Console.WriteLine($"讀取:{currentNum} ");
  if (currentNum % divisible != 0)
  {
   continue;
  }
  yield return currentNum;
 }
}


程式碼在遇到 yield return
會暫時停止 EnumerableYield 的執行
並把 currentNum 回傳到 OutputForeachList2 函式
等 OutputForeachList2 結束一個迴圈
會再次回到 EnumerableYield 函式
繼續之前的執行 EnumerableYield 函式

總結:
一般程式碼會執行到函式結束才回到上一層的函式呼叫層
yield return 能打破這個限制
暫時交出執行權
並回傳資料到上一層


2017年4月1日 星期六

C# 6.0 的 string 與 $ 符號的應用

現在 Visual Studio 2015 後支援 C# 6.0
string 出現了 $ 符號的應用。
原來字串組合是這麼寫的:

public string ID { set; get; }
public string Name { set; get; }
public string FullName = string.Format("{0}-{1}", ID, Name);

現在可以這樣寫:

public string ID { set; get; }
public string Name { set; get; }
public string FullName = $"{ID}-{Name}";

兩種寫法是一樣的,但是卻大大的增加可讀性。

2017年3月1日 星期三

sealed class 禁止繼承

實做上
通常建立一些管理物件
為了統一控管
不想被多個物件操作
我們可以利用 sealed class 的關鍵字
禁止其他類別繼承 sealed class
藉此操作物件內的資料
以下是 sealed class 的用法


sealed public class S3Mgr
{
 ....
}


只要繼承 S3Mgr 就會編譯錯誤


partial class 將 class 分成多個 cs 檔

假設某些專案規模很大
總有些 cs 檔案
常常有人修改
程式碼也很多
每每簽入都要處理衝突
或許重構可以根本解決這樣的問題
但是當時間有限沒有足夠的時間做重構
 partial class 或許可以解燃眉之急
利用 partial class 可以將 class 分成多個 cs 檔案


// A.cs 檔
partial class Program
{
public A _a = new A();
....
}


// B.cs 檔
partial class Program
{
public B _a = new B();
....
}


編譯器會將 A.cs 與 B.cs 視作是同一個檔案同一個 class
也就是說 A.cs 可以直接取到 B 類別
 B.cs 可以直接取到 A 類別
就像是在同一個 class 一樣

這樣的手法
可以幫你分類功能
依據你需要修改的內容
移到獨立的 cs 檔案內
避免多人修改同一個 cs 檔
也能方便管理類別
避免類別內過多的程式碼
有助於程式碼的閱讀


C# Composite Pattern 組合模式


組合模式最關鍵的地方是簡單對像和復合對像實現相同的接口


/// <summary>
/// 圖形抽像類
/// </summary>
public abstract class Graphics
{
 public string Name { get; set; }
 public Graphics(string name)
 {
  this.Name = name;
 }

 public abstract void Draw();
 public abstract void Add(Graphics g);
 public abstract void Remove(Graphics g);
}


簡單圖形


/// <summary>
/// 簡單圖形類——線
/// </summary>
public class Line : Graphics
{
 public Line(string name)
  : base(name)
 { }

 // 重寫父類抽像方法
 public override void Draw()
 {
  Console.WriteLine("畫線:" + Name);
 }

 public override void Add(Graphics g)
 {
  throw new Exception("不能向簡單圖形Line添加其他圖形");
 }
 public override void Remove(Graphics g)
 {
  throw new Exception("不能向簡單圖形Line移除其他圖形");
 }
}

/// <summary>
/// 簡單圖形類——圓
/// </summary>
public class Circle : Graphics
{
 public Circle(string name)
  : base(name)
 { }

 // 重寫父類抽像方法
 public override void Draw()
 {
  Console.WriteLine("畫圓:" + Name);
 }

 public override void Add(Graphics g)
 {
  throw new Exception("不能向簡單圖形Circle添加其他圖形");
 }
 public override void Remove(Graphics g)
 {
  throw new Exception("不能向簡單圖形Circle移除其他圖形");
 }
}


複雜圖形


/// <summary>
/// 複雜圖形,由一些簡單圖形組成,假設該複雜圖形由兩條線組成
/// </summary>
public class ComplexGraphics : Graphics
{
 private List<Graphics> complexGraphicsList = new List<Graphics>();

 public ComplexGraphics(string name)
  : base(name)
 { }

 /// <summary>
 /// 複雜圖形的畫法
 /// </summary>
 public override void Draw()
 {          
  foreach (Graphics g in complexGraphicsList)
  {
   g.Draw();
  }
 }

 public override void Add(Graphics g)
 {
  complexGraphicsList.Add(g);
 }
 public override void Remove(Graphics g)
 {
  complexGraphicsList.Remove(g);
 }
}


實際執行


class MyClass
{
 static void Main(string[] args)
 {
  ComplexGraphics complexGraphics = new ComplexGraphics("複雜圖形 - 兩條線段組成的複雜圖形");
  complexGraphics.Add(new Line("線段A"));
  complexGraphics.Add(new Line("線段C"));

  // 顯示複雜圖形的畫法
  Console.WriteLine("複雜圖形的繪製:");
  Console.WriteLine("---------------------");
  complexGraphics.Draw();
  Console.WriteLine("複雜圖形繪製完成");
  Console.WriteLine("---------------------");
 }
}


優點:
組合模式介面都一致,可以存在容器統一處理

缺點:複雜度會增加


2017年2月1日 星期三

C# Template Pattern 樣板模式


遇到流程一樣,但是處理邏輯不一樣的狀況,可利用 Template Pattern 樣板模式

建立一個 UnitFlowBase 抽像類別提供框架,裡面有三個方法
Node1      (每個測試類別只都執行一次)
Node2      (每次執行測試方法時都執行一次)
....
UnitTest   (執行測試方法,裡面通常會執行多個 UnitFlowBase  提供的方法
所以才會說 UnitFlowBase 提供框架,例如:此範例  UnitTest 執行了 Node2() 與 Node3())


public abstract class UnitFlowBase
{
    protected UnitFlowBase()
    {
        Node1();
    }

    protected virtual void Node1()
    {
    }

    protected virtual void Node2()
    {
    }

    protected abstract bool Node3();

    public void UnitTest()
    {
        Node2();
        Console.WriteLine(Node3() ? "Assert Successful." : "Assert Fail.");
    }
}


建立 UnitCounter1 與 UnitCounter2
Execute方法 顯示目前 ClassCount 跟 MethodCount 執行次數


public class UnitCounter1 : UnitFlowBase
{
    private int _classCounter = 0;

    private int _methodCounter = 0;

    protected override void Node1()
    {
        _classCounter++;
    }

    protected override void Node2()
    {
        _methodCounter++;
    }

    protected override bool Node3()
    {
        Console.WriteLine($"ClassCounter1 : {_classCounter}");
        Console.WriteLine($"MethodCounter1: { _methodCounter}");

        return true;
    }
}

public class UnitCounter2 : UnitFlowBase
{
    private int _classCounter = 0;

    private int _methodCounter = 0;

    protected override void Node1()
    {
        _classCounter += 2;
    }

    protected override void Node2()
    {
        _methodCounter += 2;
    }

    protected override bool Node3()
    {
        Console.WriteLine($"ClassCounter2 : {_classCounter}");
        Console.WriteLine($"MethodCounter2: { _methodCounter}");

        return true;
    }
}


建立一個 UnitCounter1 與 UnitCounter2 類別,各執行二次 UnitTest 方法


class Program
{
    static void Main(string[] args)
    {
        UnitCounter1 unit1_ = new UnitCounter1();
	UnitCounter2 unit2_ = new UnitCounter2();
        unit1_.UnitTest();
        unit1_.UnitTest();
        unit2_.UnitTest();
	unit2_.UnitTest();
    }
}


執行結果:
ClassCount : 1
MethodCount : 1
Assert Successfull.
ClassCount : 1
MethodCount : 2
Assert Successfull.
ClassCount : 2
MethodCount : 2
Assert Successfull.
ClassCount : 2
MethodCount : 4
Assert Successfull.


2017年1月2日 星期一

設計模式 Simple Factory 簡單工廠模式

情境:
要設計一個連接資料庫的物件,提供 MSSQL 與 MYSQL 兩種連線方式
讓使用者使用

 1.首先定一個介面

public interface IDBConnection
{
    void GetIDBConnection();
}

2.實作 MYSQL 與 MSSQL 資料庫連線方式

public class MSSQL : IDBConnection
{
    public void GetDBConnection()
    {
        Console.WriteLine("MYSQL連線 ");
    }
}

public class MYSQL:IDBConnection
{
    public void GetDBConnection()
    {
        Console.WriteLine("MYSQL 連線");
    }
}

3.實做工廠類別


public class ConnectionFactory
{
    public static IDDConnection GetConnection(DBType type) 
    {
        IDDConnection db_ = null;
        switch (type)
        {
            case DBType.MySQL:
                db_ = new MYSQL();
                break;
            case DBType.MSSQL:
                db_ = new MSSQL();
                break;
            default:
                Console.WriteLine("default type");
                break;
        }
        return db_ ;
    }
}


4.外部使用簡單工廠模式


class Program
{
    static void Main(string[] args)
    {
        IDBConnection Connection_ = ConnectionFactory.GetConnection(DBType.MySQL);
        Connection.GetDBConnection();
        Console.ReadKey();
    }
}


Visual Studio 2017/2019 推薦的擴充功能與更新

參考文章: 覺得 Google 的 Blogger 不太順手?透過 HTML 的 iframe 移花接木 HackMD
