一開啟 Docker 發現有錯誤訊息
error during connect: Get http://%2F%2F.%2Fpipe%2Fdocker_engine/v1.39/version: open //./pipe/docker_engine: The system cannot find the file specified. In the default daemon configuration on Windows, the docker client must be run elevated to connect. This error may also indicate that the docker daemon is not running.
查了一下,發現 Docker 沒有開啟,重起一下就正常了。
2018年9月11日 星期二
2018年9月10日 星期一
在 docker 的 ubuntu 安裝 dotnet 不能執行的問題解決方法
在 docker 的 ubuntu
安裝 dotnet 2.1 後
執行
root@1473781a7c69:/# dotnet --version
出現錯誤
FailFast:
Couldn't find a valid ICU package installed on the system. Set the configuration flag System.Globalization.Invariant to true if you want to run with no globalization support.
安裝 ICU
apt-get install ICU
出現錯誤
E: Unable to locate package ICU
改成安裝 libicu-dev
apt-get install libicu-dev
就能正常安裝 ICU 與執行 dotnet
執行 dotnet 程式輸入
root@1473781a7c69:/home/linux-x64# dotnet Server.dll
出現錯誤
No usable version of the libssl was found
Aborted
再安裝 libssl
apt-get install libssl-dev
再把 openssl 1.1 降版本到 1.0 版
apt-get install -y --allow-downgrades openssl1.0
因為 dotnet 2.1 只支援 openssl 1.0
openssl 降版本後 dotnet 2.1 就能正常執行了
記得指令輸入前先執行 apt-get update
docker 的一些基礎操作
docker cp
複製本地檔案到 docker containerdocker cp foo.txt container_id:/foo.txt
範例
docker cp foo1.txt 8b44799aacc4:/foo1.txt
複製本地目錄到 docker container
docker cp src/. container_id:/target
範例
docker cp cp_test/. 8b44799aacc4:/cp_test
複製 docker container 檔案到本地
docker cp container_id:/foo.txt foo.txt
範例
docker cp 8b44799aacc4:/foo1.txt foo.txt
複製 docker container 目錄到本地
docker cp container_id:/src/. src
範例
docker cp 8b44799aacc4:/cp_test/. cp_test1
docker save
匯出 docker 的 image 到 tar 檔案docker save image_id > ubuntu.tar
docker export
匯出 docker container 到 tar 檔案docker export container_id > ubuntu.tar
範例
docker export 90c79973be12 > ubuntu.tar
docker load
載入存成 tar 的 image 檔案到 docker imagedocker load < ubuntu.tar
載入存成 tar 的 container 檔案到 docker image
docker import ubuntu.tar
docker ps
顯示執行中的 docker containerdocker ps
顯示所有的 docker container
docker ps -a
docker stop
關閉執行中的 docker containerdocker stop container_id
範例
docker stop 8b44799aacc4
docker rm
刪除 docker container(必須是關閉狀態的 container)docker rm container_id
docker images
顯示所有 imagedocker images
docker image rm
刪除 imagedocker image rm image_id
範例
docker image rm 47b19964fb50
docker run
docker 用終端機模式執行未存在的 image 成為 containerdocker run -it image_id
範例
docker run -it 47b19964fb50
發生錯誤訊息
docker: Error response from daemon: No command specified.
請改用
docker run -t -i 47b19964fb50 /bin/bash
docker exec
docker 用終端機模式執行已存在的 containerdocker exec -it container_id
範例
docker exec 47b19964fb50
docker run -it image_id 發生錯誤的解決方法
執行 docker run -it image_id
發生了錯誤訊息
docker: Error response from daemon: No command specified.
改用
docker run -t -i image_id /bin/bash 就正常了
發生了錯誤訊息
docker: Error response from daemon: No command specified.
改用
docker run -t -i image_id /bin/bash 就正常了
2018年8月27日 星期一
C# 利用變數接函式副本
變數 Action function 可以接 void Function() 的副本
例如: Action function = void Function();
變數 Action function 可以接 void Function(T) 的副本
例如: Action function = void Function(int);
變數 Func function 可以接 T3 Function(T1, T2) 的副本(PS.最後一個T3是回傳值)
例如: Func function = string Function(int, byte);
變數 Func function 可以接 T Function() 的副本
例如:Func function = int Function();
例如: Action function = void Function();
變數 Action
例如: Action
變數 Func
例如: Func
變數 Func
例如:Func
2018年8月13日 星期一
Visual Studio 2017 / 2019 Lua 語法標示的比較
Visual Studio 2017 NPL_LuaLanguageService
Visual Studio 2019 Syntax Highlighting Pack
目前使用的 Lua 語法標示
Visual Studio 2019 目前沒的選,只能用 Syntax Highlighting Pack
Visual Studio 2017 目前有3種選擇,我先選了 NPL_LuaLanguageService
大家可以參考一下。
Visual Studio 2019 Syntax Highlighting Pack
目前使用的 Lua 語法標示
Visual Studio 2019 目前沒的選,只能用 Syntax Highlighting Pack
Visual Studio 2017 目前有3種選擇,我先選了 NPL_LuaLanguageService
大家可以參考一下。
C# 上引用 Script Language 效能比較
使用了 nuget 的
MoonSharp(LUA)
CS-Script.Core(CS)
速度 func 最快
func > lua > cs
下面順序都是 func、lua、cs
執行總時間比(func = 0.0022)
1 : 87.2 : 1369.7
結論:
#不意外,cs 最慢。
初始化時間比(func = 0.0014)
1 : 132.1 : 2134
結論:
#cs 初始化超級慢,拖累執行效率。
執行時間比(func = 0.0008)
1 : 6.8 : 1.9
結論:
#意外的是,lua 竟然比 cs 慢,推測是 lua 反射查詢的機制比較複雜,拖累 lua 執行效率。
MoonSharp(LUA)
CS-Script.Core(CS)
速度 func 最快
func > lua > cs
下面順序都是 func、lua、cs
執行總時間比(func = 0.0022)
1 : 87.2 : 1369.7
結論:
#不意外,cs 最慢。
初始化時間比(func = 0.0014)
1 : 132.1 : 2134
結論:
#cs 初始化超級慢,拖累執行效率。
1 : 6.8 : 1.9
結論:
#意外的是,lua 竟然比 cs 慢,推測是 lua 反射查詢的機制比較複雜,拖累 lua 執行效率。
2018年8月7日 星期二
Visual Studio 2019 擴充功能與更新 VSColorOutput 工具 && Visual Studio 2017 擴充功能與更新 Output enhancer 工具介紹
工具 -> 擴充功能與更新
選擇「線上」搜尋「VSColorOutput」並安裝
原本「輸出」如下:
安裝後,「輸出」如下:
這下可以讓單調的「輸出」視窗製造一些彩色了!
「輸出」視窗最下面的訊息可以關掉
工具 -> 選項 -> VSColorOutput 改 Yes, I Donated! 為 True
就能關閉「輸出」視窗的廣告訊息了
目前 VSColorOutput 在 Visual Studio 2017 已經停止更新了
現在正在試用 Output enhancer 中
下面是 Output enhancer 的使用畫面截圖
選擇「線上」搜尋「VSColorOutput」並安裝
原本「輸出」如下:
安裝後,「輸出」如下:
這下可以讓單調的「輸出」視窗製造一些彩色了!
「輸出」視窗最下面的訊息可以關掉
工具 -> 選項 -> VSColorOutput 改 Yes, I Donated! 為 True
就能關閉「輸出」視窗的廣告訊息了
目前 VSColorOutput 在 Visual Studio 2017 已經停止更新了
現在正在試用 Output enhancer 中
下面是 Output enhancer 的使用畫面截圖
2018年8月3日 星期五
2018年7月21日 星期六
依據組態 Debug 或 Release 設定 App.config
安裝「擴充功能與更新」的 「 Configuration Transform」
在 「App.config」 按下右鍵,選取「Add Config Transforms」
會依據組態產生 App.config
App.config 新增一組 appSettings
<appSettings>
<add key="VER" value=""/>
</appSettings>
App.Debug.config 新增一組 appSettings
<appSettings>
<add key="VER" value="DEBUG" xdt:Locator="Match(key)" xdt:Transform="Replace" />
</appSettings>
App.Release.config 新增一組 appSettings
<appSettings>
<add key="VER" value="RELEASE" xdt:Locator="Match(key)" xdt:Transform="Replace" />
</appSettings>
VER 就會依據對應的組態設定 value 的值
PS.後面加了兩個設定:
Locator 限制條件,透過設定 Match(key) 來要求置換目標的 key 值必須相同才會執行轉換
Transform 轉換方法,透過設定 Replace 來將置換目標的 value 值換成來源值
2018年7月17日 星期二
讀取 App.config 中的內容
在 App.config 中新增一筆資料
<appSettings>
<add key="KEY" value="VALUE"/>
</appSettings>
將「System.Configuration」加入參考
加入:using System.Configuration;
利用下列程式碼,就能取出 App.config 中的內容
string Value_ = ConfigurationManager.AppSettings["KEY"];
執行後,Value_ 的值將會是 VALUE
<appSettings>
<add key="KEY" value="VALUE"/>
</appSettings>
將「System.Configuration」加入參考
加入:using System.Configuration;
利用下列程式碼,就能取出 App.config 中的內容
string Value_ = ConfigurationManager.AppSettings["KEY"];
執行後,Value_ 的值將會是 VALUE
2018年7月3日 星期二
讓 Visual Studio Code 可以開啟 sln 檔案
安裝擴充功能 vscode-solution-explorer
資料來源參考網址: https://github.com/fernandoescolar/vscode-solution-explorer https://hackmd.io/@chiisen/rkvLrbX2p
資料來源參考網址: https://github.com/fernandoescolar/vscode-solution-explorer https://hackmd.io/@chiisen/rkvLrbX2p
2018年6月4日 星期一
2018年5月7日 星期一
DI—Dependency Injection 依賴注入 超超簡單說明
一般是用來解決「耦合性(相依)過高」的問題
通常都會搭配介面 interface 進行注入
讓程式保留彈性
便於在新的需求發生時
能便於抽換
下面我舉個例子
    ///
    /// Logger 的介面
    ///
    public interface ILogger
    {
        void Print(string msg, Color color);
    }

    ///
    /// 預設的 Console Logger
    ///
    public class ConsoleLogger : ILogger
    {
        public void Print(string msg, Color color)
        {
            System.Console.WriteLine(msg);
        }
    }
超簡單一分鐘學會 DI 框架 AutoFac
DI—Dependency Injection 依賴注入
安裝 AutoFac 的 NuGet 套件
整理一下,簡單的說:
1. ContainerBuilder.Register 註冊繼承 interface 的子類別
2. Container.Resolve 取得繼承 interface 的子類別
AutoFac 功能非常強大,上面程式碼只是入門
安裝 AutoFac 的 NuGet 套件
static void Main(string[] args)
{
    // 註冊繼承 interface 的子類別
    var builder_ = new ContainerBuilder();
    builder_.RegisterType<Mylogger>().As<Ilogger>();

    // 取得繼承 interface 的子類別
    var container_ = builder_.Build();
    var logger = container_.Resolve<Ilogger>();
}
整理一下,簡單的說:
1. ContainerBuilder.Register 註冊繼承 interface 的子類別
2. Container.Resolve 取得繼承 interface 的子類別
AutoFac 功能非常強大,上面程式碼只是入門
2018年3月16日 星期五
超簡單的公開發行我的 NuGet 套件 *.nupkg 檔案讓別人安裝使用
在你製作好自己 NuGet 的 檔案
先連線到 nuget 網站
點選右上角的「Sign In」
如果沒註冊過,請先註冊
點擊「Upload」再點選「Browse....」
把你的 *.nupkg 檔案上傳到網站上
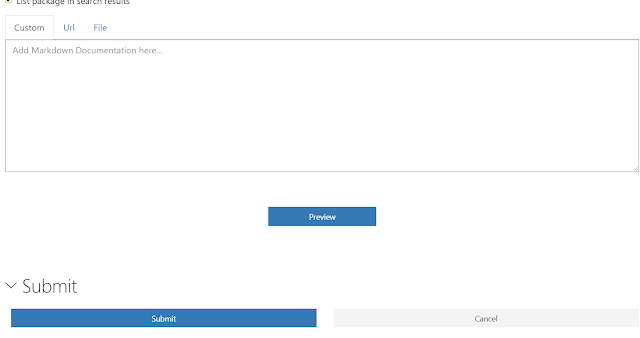
記得點擊最下方的「Submit」按鈕
才會開始上傳
上傳完畢等待一下狀態改變後,就算發行成功,大家都能抓到你的 NuGet 套件了
安裝你的 NuGet 套件同一般 NuGet 安裝方式,這邊就不累述了。
想自己發行 NuGet 套件,可參考這篇:Visual Studio 2017 上 .NET Standard 超級簡單產生 NuGet 的 *.nupkg 檔案方式
先連線到 nuget 網站
點選右上角的「Sign In」
如果沒註冊過,請先註冊
點擊「Upload」再點選「Browse....」
把你的 *.nupkg 檔案上傳到網站上
記得點擊最下方的「Submit」按鈕
才會開始上傳
上傳完畢等待一下狀態改變後,就算發行成功,大家都能抓到你的 NuGet 套件了
安裝你的 NuGet 套件同一般 NuGet 安裝方式,這邊就不累述了。
想自己發行 NuGet 套件,可參考這篇:Visual Studio 2017 上 .NET Standard 超級簡單產生 NuGet 的 *.nupkg 檔案方式
Visual Studio 2017 超級簡單的安裝本地端 NuGet 或自己製作的 *.nupkg 檔案
點選「工具」的「選項」功能
點選「NuGet 套件管理員」選擇「套件來源」功能
按下右方綠色加號,產生可套用的來源
填入「名稱」與「來源」就可讀取本地端 *.nupkg 檔案了。
如果要安裝本地端 *.nupkg 檔案
點選「工具」「NuGet 套件管理員」「管理方案的 NuGet 套件」
點選右方展開鈕
選擇本地端的 nupkg 檔案選項
選擇前記得把自己的 *.nupkg 放到剛剛指定存放的目錄裡
等看到自己的 NuGet 專案,便可同一般 NuGet 安裝方式安裝到自己的專案內
如何自己製作 NuGet 的 *.nupkg 檔案可參考這篇:Visual Studio 2017 上 .NET Standard 超級簡單產生 NuGet 的 *.nupkg 檔案方式
2018年3月1日 星期四
Windows Server 2016 開機自動啟動程式
把程式的捷徑放在下列目錄內:
C:\Users\使用者帳號\AppData\Roaming\Microsoft\Windows\Start Menu\Programs\Startup
每次開機便會自動開啟你的程式
C:\Users\使用者帳號\AppData\Roaming\Microsoft\Windows\Start Menu\Programs\Startup
每次開機便會自動開啟你的程式
2018年1月1日 星期一
簡單介紹 C# 的 yield return
情境:
找出 1 到 n 的整數中被 x 整除的數
第一版 C# 程式碼
第一版修改原因:
1.每行顯示一個數字
2.邏輯改成被 x 乘於二整除的數
針對違反「單一責任」對程式碼進行優化
雖然執行結果正確,但是會發現一個效能問題。
EnumerableList(50, 2) 會無條件跑完 1 到 50
OutputForeachList 會跑 2,4,6...50
但是 OutputFor2(50, 2) 最多只會跑 50 次
雖然提升了維護性
為了效能
只好再對程式碼再進行一次優化
程式碼在遇到 yield return
會暫時停止 EnumerableYield 的執行
並把 currentNum 回傳到 OutputForeachList2 函式
等 OutputForeachList2 結束一個迴圈
會再次回到 EnumerableYield 函式
繼續之前的執行 EnumerableYield 函式
總結:
一般程式碼會執行到函式結束才回到上一層的函式呼叫層
yield return 能打破這個限制
暫時交出執行權
並回傳資料到上一層
找出 1 到 n 的整數中被 x 整除的數
第一版 C# 程式碼
private static void OutputFor1(int max, int divisible)
{
 for (int currentNum = 1; currentNum <= max; currentNum++)
 {
  if (currentNum % divisible != 0)
  {
   continue;
  }
  System.Console.Write($"{currentNum} ");
 }
 System.Console.WriteLine();
}
第一版修改原因:
1.每行顯示一個數字
2.邏輯改成被 x 乘於二整除的數
private static void OutputFor2(int max, int divisible)
{
 //
 // 某數的2倍整除 & 顯示由上而下
 //
 #region 說明
 // 改變顯示方式及運算邏輯時都改動這段程式碼
 // 違反「單一職責」
 #endregion 說明
 int numMultiplyByTwo_ = divisible * 2;
 for (int currentNum = 1; currentNum <= max; currentNum++)
 {
  //if (currentNum % num != 0)
  if (currentNum % numMultiplyByTwo_ != 0)
  {
   continue;
  }
  //System.Console.Write($"{currentNum} ");
  System.Console.WriteLine($"{currentNum} ");
 }
 System.Console.WriteLine();
}
針對違反「單一責任」對程式碼進行優化
private static void OutputForeachList(int max, int divisible)
{
 foreach (int item in EnumerableList(max, divisible))
 {
  System.Console.WriteLine($"{item} ");
 }
 System.Console.WriteLine();
}

private static IEnumerable EnumerableList(int max, int divisible)
{
 List result_ = new List();

 for (int currentNum = 1; currentNum <= max; currentNum++)
 {
  System.Console.WriteLine($"讀取{currentNum} ");
  if (currentNum % divisible != 0)
  {
   continue;
  }
  result_.Add(currentNum);
 }
 return result_;
}
雖然執行結果正確,但是會發現一個效能問題。
EnumerableList(50, 2) 會無條件跑完 1 到 50
OutputForeachList 會跑 2,4,6...50
但是 OutputFor2(50, 2) 最多只會跑 50 次
雖然提升了維護性
為了效能
只好再對程式碼再進行一次優化
private static void OutputForeachList2(int max, int divisible)
{
 foreach (int item in EnumerableYield(max, divisible))
 {
  System.Console.WriteLine($"{item}");
 }
 System.Console.WriteLine();
}

private static IEnumerable EnumerableYield(int max, int divisible)
{
 for (int currentNum = 1; currentNum <= max; currentNum++)
 {
  System.Console.WriteLine($"讀取:{currentNum} ");
  if (currentNum % divisible != 0)
  {
   continue;
  }
  yield return currentNum;
 }
}
程式碼在遇到 yield return
會暫時停止 EnumerableYield 的執行
並把 currentNum 回傳到 OutputForeachList2 函式
等 OutputForeachList2 結束一個迴圈
會再次回到 EnumerableYield 函式
繼續之前的執行 EnumerableYield 函式
總結:
一般程式碼會執行到函式結束才回到上一層的函式呼叫層
yield return 能打破這個限制
暫時交出執行權
並回傳資料到上一層
訂閱:
文章 (Atom)
Visual Studio 2017/2019 推薦的擴充功能與更新
參考文章: 覺得 Google 的 Blogger 不太順手?透過 HTML 的 iframe 移花接木 HackMD
-
把程式的捷徑放在下列目錄內: C:\Users\使用者帳號\AppData\Roaming\Microsoft\Windows\Start Menu\Programs\Startup 每次開機便會自動開啟你的程式
-
在「設定」中輸入 editor.fontsize 如下圖框內調整字體大小 PS、目前不支援Ctrl + mouse scroll up/down 調整字體大小 Ctrl + 放大字體 Ctrl - 縮小字體


