2019年2月26日 星期二

Microsoft Visual Studio 無法連接到 Web 伺服器 'IIS Express' 的解決方法

今天莫名其妙出現「無法連接到 Web 伺服器 'IIS Express'」的錯誤訊息


一直無法 Debug
查了一下專案「屬性」設定


修改「偵錯」頁籤
的「應用程式 URL」後面得 Port
就能正常偵錯了

2019年2月25日 星期一

ASP.NET Core (包含 .NET Core)依據組態為 Release 或 Debug 取得各自的設定內容

首先取得目前的組態,如下列的程式碼:
原理可以參考這篇:怎樣判斷 .NET Core (包含 ASP.NET Core)是 Debug 或 Release ?


    public static class DebuggingProperties
    {
        /// 
        /// 檢查當前正在運行的程式組態。
        /// 
        public static string Config
        {
            get
            {
                if (_ConfigAttribute == null)
                {
                    var assembly = Assembly.GetEntryAssembly();
                    if (assembly == null)
                    {
                        // 由於調用 GetFrames 的 StackTrace 實例沒有跳過任何幀,所以 GetFrames() 一定不為 null。
                        assembly = new StackTrace().GetFrames().Last().GetMethod().Module.Assembly;
                    }

                    var assemblyConfigurationAttribute = assembly.GetCustomAttribute();
                    _ConfigAttribute = assemblyConfigurationAttribute.Configuration;
                }

                return _ConfigAttribute;
            }
        }

        private static string _ConfigAttribute;
    }

appsettings.json 檔案設定格式如下:


{
  "Release": {
    "DefaultConnection": " Release Server"
  },
  "Debug": {
    "DefaultConnection": "Debug Server"
  }
}

需要組態設定時,只要如下呼叫即可: 在 Startup.cs 新增下列程式碼:
            public IConfiguration _config { get; } 

// 取的 appsettings.json 的設定
public Startup(IConfiguration configuration)      
{                                               
    _config = configuration;                
}                                                 


// 執行中取得組態設定的方式
public void Run()
{
    // 取的 appsettings.json 的 Release 或 Debug 組態設定
    var cfg_ = _config.GetSection(DebuggingProperties.Config);
    // 取的 appsettings.json 指定組態設定內容
    string def_ = cfg_ .GetValue("DefaultConnection");
            }

2019年2月23日 星期六

2019年2月22日 星期五

Ubuntu 執行後出現錯誤訊息 The type initializer for 'Gdip' threw an exception. 錯誤訊息的解決方法

最近安裝了 nuget 的 NPOI 來處理 excel 檔案
在 Ubuntu 的 Linux 環境發生了 The type initializer for 'Gdip' threw an exception. 的錯誤訊息
執行 sudo ln -s /lib/x86_64-linux-gnu/libdl.so.2 /lib/x86_64-linux-gnu/libdl.so
執行完畢,就能解決這個問題。

怎樣判斷 .NET Core (包含 ASP.NET Core)是 Debug 或 Release ?

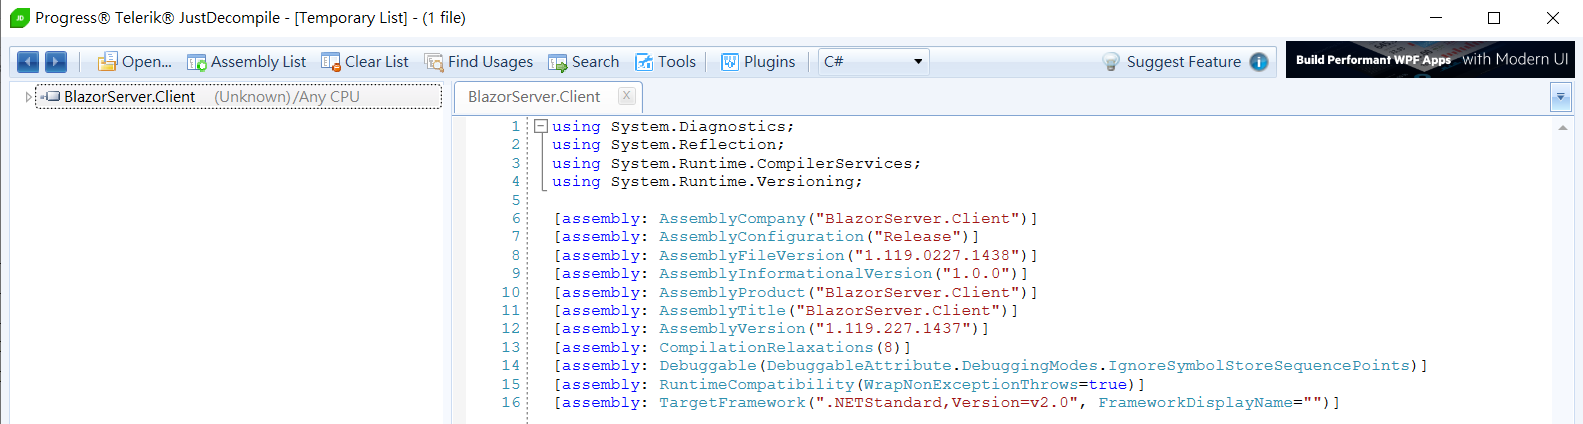
用 JustDecompile 可以看到 DLL 的資訊

下面是 Debug 版本的資訊 :


下面是 Release 版本的資訊 :

這樣我們可以用下面的程式碼,判斷 DLL 是否為 Debug 版本。


2019年2月20日 星期三

在多個 .NET Core 版本之間進行切換

建立一個 global.json
{
  "sdk": {
    "version": "2.1.503"
  }
}
只要指定版本號,就能執行 .NET Core 特定版本號

升級 dotnet core 3.0 造成 Blazor for dotnet core 2.1 無法執行的問題解決

編譯後在 ubuntu 上執行發生錯誤訊息:
It was not possible to find any compatible framework version
The specified framework 'Microsoft.AspNetCore.App', version '2.1.8' was not found.


原因是 AspNetCore 預設使用 2.1.8
而 Blazor 只能在 2.1.7 上正常執行
解決方法是修改 Visual Studio 的 *.csproj
指定 AspNetCore 的版本號為 2.1.7
PackageReference Include="Microsoft.AspNetCore.App"


修改設定指定版本為 2.1.7
(AWS EC2 預設 Image 為 2.1.2 改成 2.1.2 試過可以正常執行)
PackageReference Include="Microsoft.AspNetCore.App" Version="2.1.7"


重新編譯後的新版本就能正常的執行了

PS.如果在 Visual Studio 2017 出現錯誤訊息:
Unhandled Exception: System.IO.FileLoadException: Could not load file or assembly 'Microsoft.AspNetCore, Version=2.1.7.0, Culture=neutral, PublicKeyToken=adb9793829ddae60'. The located assembly's manifest definition does not match the assembly reference. (Exception from HRESULT: 0x80131040)
只要把剛剛的修改還原就能 Debug 了。

2019年2月14日 星期四

為 Ubuntu 增加 PATH 的環境變數

修改系統檔案都要用 root 權限
先執行 sudo su 換 root 權限
可以用 vim /etc/profile

然後
按下 i
在檔案末端加上
export DOTNET_ROOT=$HOME/dotnet
export PATH=$PATH:$HOME/dotnet

或直接指定安裝路徑
export DOTNET_ROOT=/usr/share/dotnet
export PATH=$PATH:/usr/share/dotnet

輸入 :wq
離開 vim 編輯

執行 . /etc/profile

就能在任何目錄上呼叫 dotnet 了


Git GUI 中文亂碼解決方法

開啟 Edit = Option 選單

選擇 Default File Contents Encoding 為 utf-8

Save 存檔後,就正常顯示中文了。

2019年2月13日 星期三

重置 WSL Ubuntu

點擊 「應用程式設定」


點擊「重置」


再進入 Ubuntu 就會要求你輸入新的帳號跟密碼

NLog 的 NLog.config 的設定簡介

NLog 的 NLog.config 的設定內容主要有兩個 target 與 rules


target 內容如下:

target name="fatalFile" xsi:type="File"
        fileName="${basedir}/Logs/FatalFile.txt"
        layout="${longdate} | ${level:uppercase=true} | ${message} ${newline}"

target  的 fileName 為檔案名稱。
${basedir} 表示目前程式執行的目錄(暫訂為 c:\temp)
所以輸出的檔名會是 c:\temp\Logs\FatalFile.txt
target  的 layout 為 Log 輸出的格式,如下:

2019-01-10 14:25:03.0966 | TRACE | 程式結束執行!

${longdate} 代表寫 Log 當下的時間
${level:uppercase=true} 代表 log level 並轉大寫
${message} ${newline} 代表 寫下 Log 內容並換行。

rules 內容如下:

logger name="*" levels="Trace, Debug, Info, Warn" writeTo="fatalFile"

writeTo 也就是指剛剛 target name

levels 是要記錄的 log level


Visual Studio 2017/2019 推薦的擴充功能與更新

參考文章: 覺得 Google 的 Blogger 不太順手?透過 HTML 的 iframe 移花接木 HackMD
